I am a longtime fan of Liberating Structures and since the pandemic I’ve been working to adapt them to Zoom meetings. One adaptation that’s gone well is Troika Consulting, which I call “Tag Team.” This activity engages trios to help each other through a highly structured conversation. This conversation/structure focuses on a single individual and is repeated three times so that everyone helps and is helped.
Modifications
The original version of this activity uses a “consulting” metaphor, which I find dissonant in the formal and informal learning spaces that I facilitate, so I use different language. Also, in the in-person version, there’s a period of time where one participant turns their back on the group to listen, but not participate in the conversation. On Zoom, this effect is achieved by having the person turn their microphone and camera off. I also add a step before the groups are formed, so that individual participants can figure out what they want to present to others. Here’s how it works:
Step One: Gaining Clarity
Because the timing of Tag Team is so fast-paced, I feel it’s necessary to give folks time to think about their problem before jumping in. I generally do this in one of two ways: engaging in a series of quick conversations through speed thinking, or a 10-20 minute period of private freewriting. I usually decide the method based my instincts about the participants, how well they know each other, and how much they trust me.
Step Two: Explaining the Process
The Tag Team process is pretty technical, as far as these things go, and needs to be explained before participants are left on their own to do it.

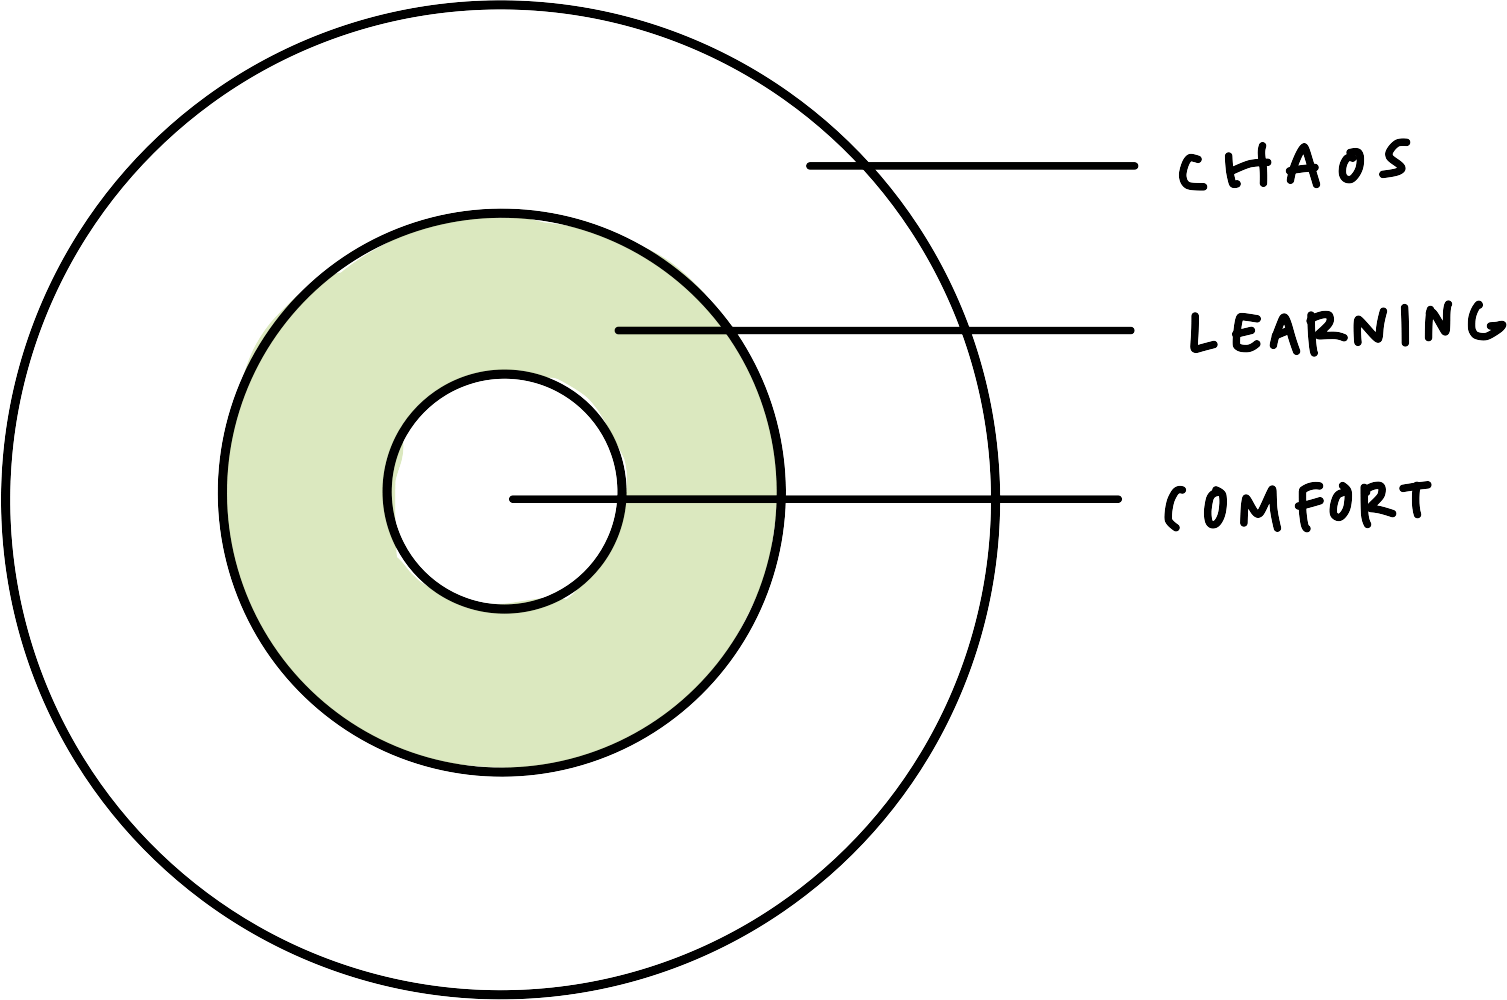
I use the above graphic in a series of slides where each time I advance the slide another row is revealed (so at first, they only see “Decide,” then I click and they see “Share,” and so on.
First, I tell folks they’ll be put into breakout rooms in threes. Once they get in the room they’ll have one minute to decide who will go first. That person will share their problem, then the other two will ask clarifying questions, then the person who has the problem will turn their camera/microphone off while the other two discuss the problem. Last, the person will turn their camera/microphone back on and reflect on what they hear in an appreciative spirit (not a “I’ve already done that” or “That’ll never work” attitude). All this happens in the time span of 10-minutes, so it’s a quick-paced and very focused experience. The group switches to another person and they repeat the process until everyone has gone, for a total of 30-minutes.
Step Three: Breaking Out into Rooms
I create breakout rooms in random groups of three and give folks a link to this cheatsheet so they can remember the steps once they’re out of the main Zoom room. I open the rooms, wait a minute (while they arrive and decide who will go first), and then send the following fly-in announcements at the appropriate time intervals:
First person: share what you need help with and why. (2 minutes)
Other two: ask clarifying questions. (2 minutes)
First person: cam/mic off. Other two: discuss how you’d address the issue. (4 minutes)
First person: cam/mic on. Reflect on what you heard. (2 minutes)
Time to switch! Second person: share what you need help with and why. (2 minutes)
etc.
To keep the time, I use the app MultiTimer, which allows me to track where I am in the process and know when to send each announcement.


I also have all the announcements written out in bulleted list in the slide notes so that I can cut and paste each announcement as I go. Because I cut instead of copy, I know exactly where I am in the announcements. In the example below, you can see what it would look like if I’d already sent the first three announcements and was waiting for the timer to tell me when to send the next.

Troubleshooting
This activity has been successful across many types of participant groups (students, professionals, members of the public), but it still has room for improvement.
First, it’s tricky if the groups do not evenly divide into threes. When I have co-host(s), I’ll assign them to a pair and ask that one of the pair goes twice (better to go twice than spend longer on the activity). When I don’t have co-hosts I’ll assign foursome(s) and ask one person in the group to take a pass.
Also, sometimes folks don’t quite get the rules or why they need to turn their camera off, etc. This may be helped by doing a brief demonstration of the conversation in front of everyone before they jump into breakout rooms (thanks to Nancy for this idea).
Additionally, the Zoom breakout room announcements are easy to miss and it may be better to close the rooms after 10 minutes, bring everyone back, and then open them back up, just so everyone gets their full time (thanks to Robin for this idea).
As I experiment with these alternatives, I’ll update this blog post with how my process evolves.
The Best Part
The best part of this activity is the warm smiles on the faces of people coming back into the main room when the 30-minutes are up. It seems to facilitate real connection in a virtual environment, and, based on reports from participants, is actually helping people. I definitely recommend it and invite you to share your experiences and modifications with me so I might learn from them as well!